Generating IP in the Vivado GUI
making magic boxes
Please Log In for full access to the web site.
Note that this link will take you to an external site (https://shimmer.mit.edu) to authenticate, and then you will be redirected back to this page.
IP? What's that?
When you don't want to write something for yourself, if its too complicated or not what you're trying to focus on, it's possible Vivado already has it for you!1 Alongside Vivado, Xilinx has a whole library of IP that might cover the tasks you're trying to accomplish. If you found a datasheet online describing some "Xilinx LogiCORE IP" (among other names), the IP Catalog is where Xilinx is keeping it. We see a lot of teams using an IP to implement an FFT for a project, among a handful of others. If you're planning to use IP in your project, you're going to need a way to get a hold of it. That's what this guide is for!
Some part of this guide is adopted from a lab assignment from Fall 2023, which is still available on the internet. If you want to just get some dry practice building some trivial IP (and using a cool open-source debugging tool made by an earlier TA!), you can run through that lab here. It's a pretty short lab. No promises that every instruction there is still accurate though.
Getting our IP
The way that IP in Vivado is actually kept is complicated--sometimes it'll be some verilog you can just read, sometimes it'll be written in VHDL, sometimes it'll be encrypted so you can't look at the source files, it's all a mess. And the only way to get access to it all is if you use Vivado through its GUI, which is something we've attempted to shield you from until now. But, to keep ourselves sane, we're just going to use the GUI to generate the IP; once you've designed your magic box, you're going to take the file Vivado uses to specify it and drop it into your typical lab directory structure. That file is an XCI file, and is the only thing you'll need to walk away with when you leave the Vivado GUI.
The overall shape of what you're going to do to get your magic boxes is gonna look something like:
- log into lab machine (probably)
- open vivado
- make a project
- select your IP and all its options
- grab the XCI file Vivado generates (and slightly modify it--see below)
- profit??? probably profit
lets get into it.
Make a Project
If you have Vivado actually installed, just open it up by running vivado (or maybe clicking a link if you made one). If you are using Vivado remotely through the terminal (using lab-bc) you'll need to instead use one of the lab computers this time. Go to one of the lab computers that has Ubuntu installed (at stations 20-32), log in using your MIT kerberos/username. Your password will be your nine-digit MIT id. Once logged in you'll be in Ubuntu.
Open up a terminal and run vivado. This will launch the Vivado GUI. Once it comes up it'll ask if you want to make a new project. Say yes. Name it whatever. Your favorite soup. I don't care (don't put spaces in it though). Choose it to be a RTL Project. Click through the next few steps (no need to add any sources or constraints). When you get to the step where it prompts you for what type of FPGA or board (the "default part") you're using (see picture below), target the xc7s50csga324-1 part (this is important).

Click Next until you're done and you'll find yourself in a Vivado project's home.
We're not going to actually build anything here. Instead we're just going to use the GUI to customize some IP modules for us2. We'll then grab the files it generates, and bingo bango bongo, we'll get out of here and back to our regular framework.
Generate your IP
On the left side of the Vivado environment, there is an IP catalog button. Click on it, and then when you see the catalog search for whatever IP you're looking for: FFT, CORDIC, floating point math, or whatever else. For the sake of an example, we'll generate a 32 bit floating point adder here. Search for "float;" one option should come up for making floating point IP. Double click on it to get to the IP generation GUI.
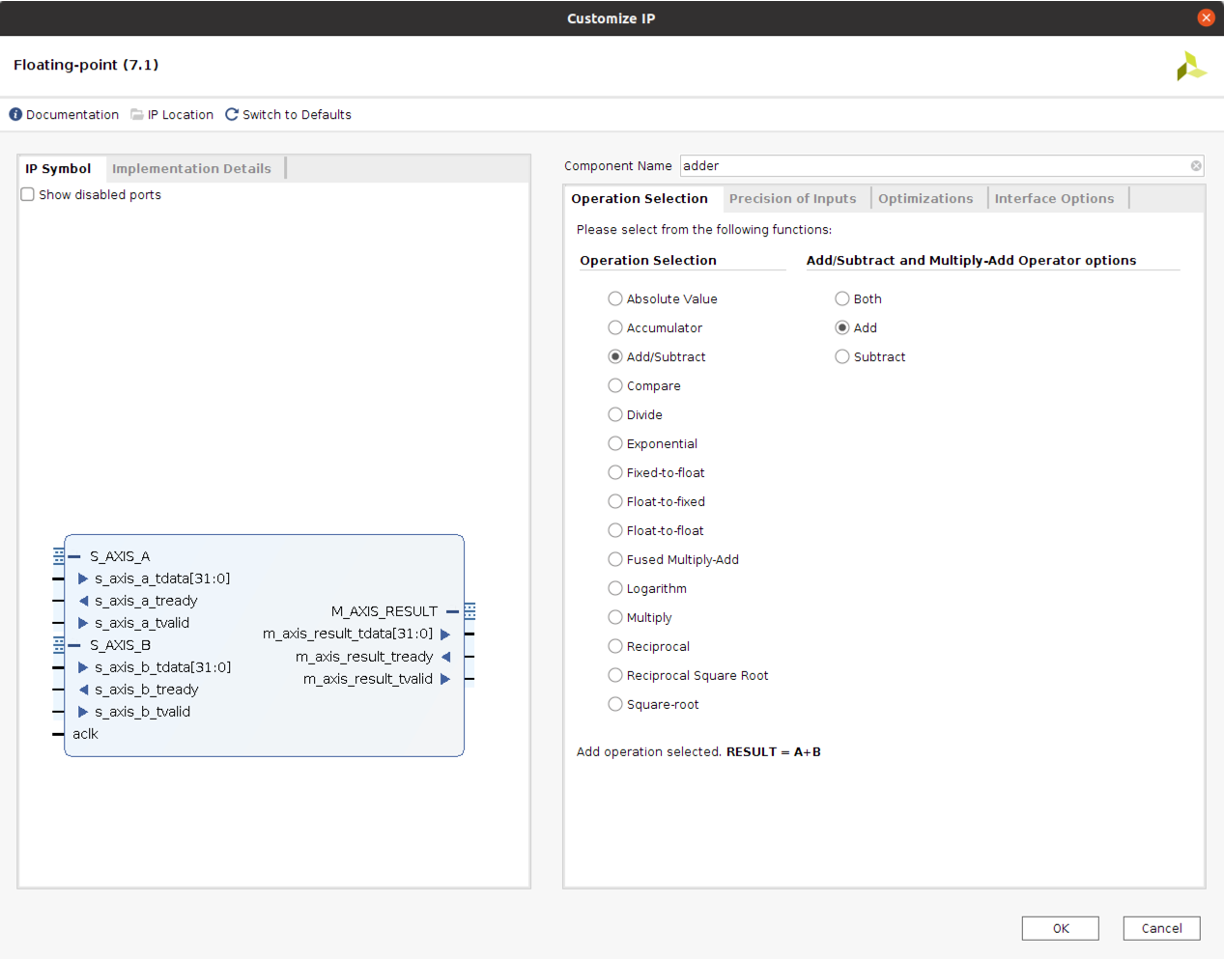
While you're here, you can also take a detour into the "Implementation Details" tab (on the left) to see details about how many resources (BRAMs, FFs, LUTs, etc) the current settings you've chosen are expected to use up on your FPGA!
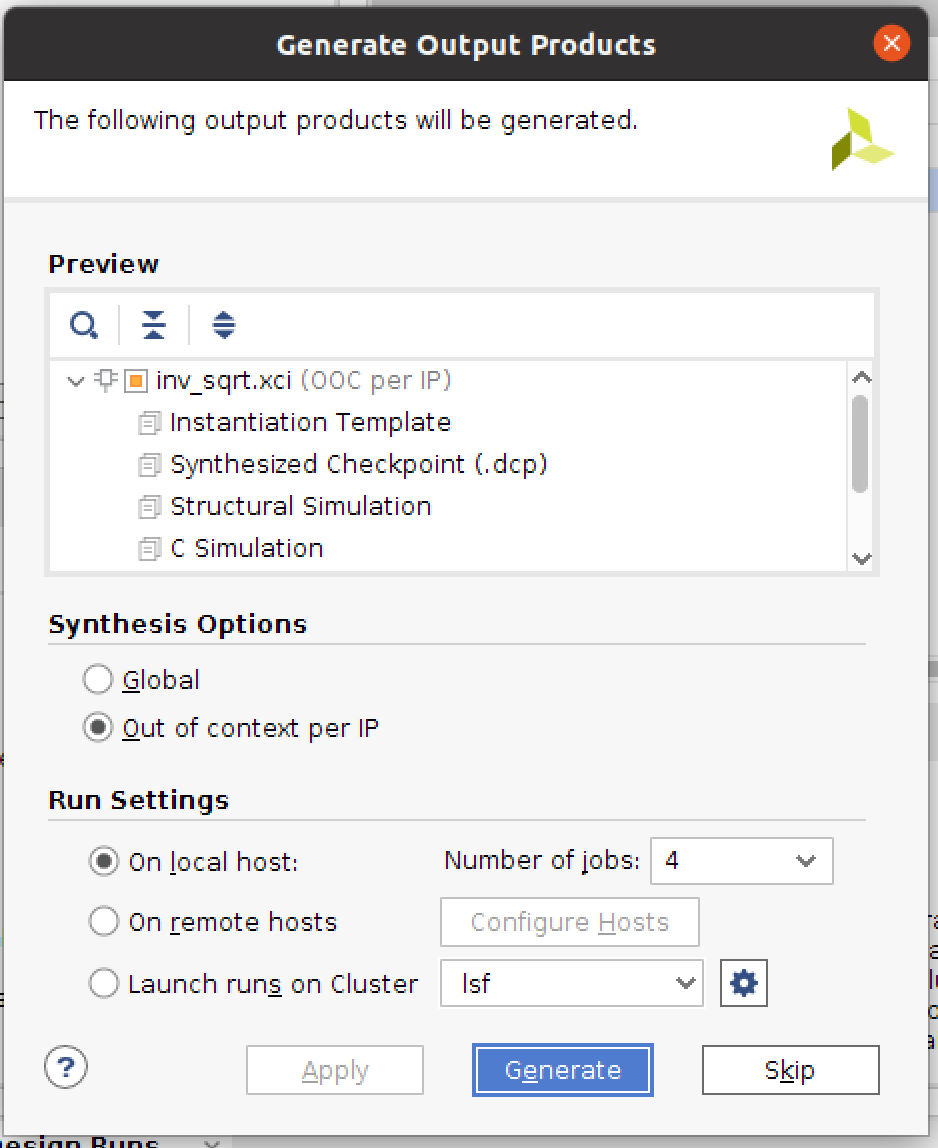
When ready click ok/build and give it a little bit. There will likely be a window that pops up saying something about generating Out of Context Products. That's fine. Click ok with the default options it gives.
Steal the files, escape the GUI
Now that you've generated your IP, you need to get to it. The files we care about are called .xci file and each IP has one. Find the folder you made for this project (probably called "project_1" in your home directory if you just used the defaults). In that folder go into project_1.srcs. In there will be a folder called sources_1 or something and in there will be a folder called ip. That's the one we want. Inside it will be one folder for each IP module you've made. Each one of those folders has an .xci file in it. That's the file we want!
Copy that file to a new spot, and open it up in a text editor. There are a couple lines of changes we need to make to it, since we're divorcing it from the Vivado directory structure.
In each .xci file you generated, you need to change the file path in two spots. The two spots are the "gen_directory" and the "OUTPUTDIR" lines. Change the file paths there so they are the appropriate relative locations for our projects and where we put IP. For example, changing my adder's file I did:
"gen_directory": "./ip/adder"or whatever you named your IP"OUTPUTDIR": [ { "value": "./ip/adder" } ],
Do that for all three .xci files. then once done, you're all set to use them. Do what you need to do to get those XCI files back to yourself--if you're on a lab computer, maybe email it or use a flash drive or something.
Bring it home: IP in our directory structure
Now that you've got your XCI file, your typical build flow (that build.tcl file you've been using to build your labs) has the information it needs to use the IP you designed! Put the XCI file(s) into an ip folder in your project's directory; if you had a few IP blocks you generated, it might look something like this (Vivado likes to keep IP files separate):
hdl/
sim/
ip-->+
     |
     adder-->+adder.xci
     |
     multiplier-->multiplier.xci
     |
     inv_sqrt-->inv_sqrt.xci
With the IP in these spots, the build.tcl script we've been using in labs should be able to find and read all the XCI files you generated. Now, you can utilize instances of these IP modules just like any other module; its inputs and outputs will have the names and widths you saw back in the GUI when you generated the IP. When you build your design, Vivado will fill in the module with the IP! Building with IP will take a big longer than your designs that don't have IP. That's ok.
Simulating IP: using Vicoco!
Since IP is a black box that we don't get to see the Verilog of, we can't simulate it using normal Cocotb/iVerilog stuff like we've been doing; you can't add a verilog source to your "sources" list if you don't have a verilog source to look at! But we still need to be able to run simulations with our IP; if anything, it's especially important now because you need to be able to figure out how your IP is going to format the data it spits out at you! This is where Vicoco is going to come into play again--it'll let us run Cocotb with the Vivado xsim simulator, which has the ability to access all the encrypted files our IP will need.
You hopefully already got Vicoco running when you were testing the signed math in your convolution lab work, but if you didn't, refer to the Vicoco documentation page to get things running. If you don't have Vivado running locally, you can use lab-bc simulate ... to run a Vicoco test remotely.
To get a Vicoco testbench to be able to access IP, you can add a source to your testbench's sources list that is the XCI file you just got! It might look like adding an element to your sources list that looks like proj_path / 'ip' / 'adder' / 'adder.xci', in the floating-point addition example from above.
It's probably a good idea for the IP to not be your testbench's top level; this seems to make xsim happier. If you just want to write a test for the IP and none of your own design, you could write an adder_wrap.sv file (or similar) that just instantiates the adder and connects its ports to the wrappers inputs and outputs.
As with everything related to Vicoco, this is experimental: if you get scary looking errors, come talk to Kiran and hopefully everything will be okay afterwards. But Kiran's tested this with a number of common IP blocks (including FFT and CORDIC), so hopefully things will go ok :)
Your Job: understanding your magic box
Congrats! Now you have your IP block, and you have the ability to test it! Now, your job is to figure out how to use it and design around it; the datasheet/product guide for the IP will tell you lots about the modes you can put your IP into, and how it'll expect you to format inputs and how to interpret its outputs. AXI-Streaming comes up a lot here. Experiment with your IP in simulation, and figure out how to get meaningful data out of it! And then you'll be off to the races.