An PopCat By Any Other Name
Image Sprites and Color Maps
Please Log In for full access to the web site.
Note that this link will take you to an external site (https://shimmer.mit.edu) to authenticate, and then you will be redirected back to this page.
Intro
The boxy sprites that we used in week 04 are super useful for doing lots of things, but they’re not the most exciting thing to look at. We'd like to figure out how to replace them with images that we provide ourselves. Like a cat.
Setup
Build a new project with the regular folder structure. You should be able to get by with the same XDC file we used last week.
Into your hdl folder include:
hdmi_clk_wiz.v: The clock management module (same as Week 04)- Your working versions of:
tmds_encoder: your TMDS encoder module from week 04 including (if it is in a separate file):tmds_choice: your TMDS encoder module from week 04.
tmds_serializer, the TMDS serializer from Week 04.video_sig_gen: your video signal generator module from week 04.
image_sprite.sv: A starting skeleton to make an image sprite module which we'll focus on in this page.xilinx_single_port_ram_read_first.v: A single-port memory device to be used in yourimage_spritemodule.top_level.sv: A starting skeleton for the first part of lab.
In addition, make one other folder in your project folder, called data. Leave it empty for time being.
Finally, make one last folder called util Outside of your project folder...into util put the following two files:
pop_cat.png: A 256x256 pixel .png file of the popcat meme.img_to_mem.py: A file to process an image and turn it into the appropriate files for our block RAMs.
Making Images
We're going to store an image on our FPGA, however we need to be clever about doing this since memory is at a premium. If we were to directly store the full-color RGB values of each pixel in a full-frame image, we’d need 1280 \times 720 \times 24 = 22.1184\text{ Mbits} of onboard storage on the FPGA. Our FPGAs don't have anywhere near that (2.764 Mbits), so we’ll have to somehow "compress" or alternatively do something to the image content of our sprites if we want to store any meaningfully large sprites.
We’re going to do this by palletizing our image. Instead of picking from any of the 16.7 million colors that we can specify with our 24-bit RGB value, we’ll restrict ourselves to only using a handful of colors - a selected palette to draw from. We’ll then encode each pixel with a variable that corresponds to what color in the palette it represents. We’ll now need to store both the palletized image and the palette itself, but it’ll still be an improvement on the ~20Mbits required to store an uncompressed frame in full color. 1
This means that we'll need to have two read-only memories (ROMs) in our sprite - one to store the palletized image, and one to store the palette. For this we'll use the FPGA's block memory, which is a set of memory modules scattered about the chip that we can configure into one big memory of (almost) whatever size we'd like. We'll build our two ROMs this way, and since they're made of block memory, we'll call them BROMs for short.
The block memory that we use to make these BROMs is not inherently Read-Only. It is in fact readable and writeable in a general sense. We'll disable the write-enable control for these use cases so that we only every read from it. So yes it is a BRAM (block RAM), but in practice we'll use them as BROMs (block Read-Only-Memories).
Let's walk through a quick example of how we'd use our BROMs to generate our sprite. Let's say we wanted to retrieve the color of the pixel at some location (x, y), inside a sprite of some size, say (w, h):
-
Since our BROMs are 1D memories we have to find the location of (x, y) in our image data. The pixels in the BROM are encoded in the same order as raster scan would scan them out, so they're ordered from left to right, and top to bottom. This means that we'd find the our pixel value at the BROM address x + (y*w). 2
-
The output of this BROM tells us what color to grab from the palette. Let's say it outputs the value
8b'0000_0111, which tells us to get the data at address7in the palette BROM. -
The pallete BROM outputs the color data with the same 24-bit RGB encoding that we've seen earlier. Let's say it outputs the value
24'hFF_00_FF, which corresponds to a RGB value of(255, 0, 255), which should be purple.
To use these BROMs in our design, we'll need to provide both the contents of the BROM as well as the Verilog for actually synthesizing them. For the former, we'll be generating a .mem file for each BROM to load its contents from. We've provided a python script to do this, which you can run with:
python3 util/img_to_mem.py <input_image_path>
This does require you to install the PIL library which can be done with pip install Pillow. If you get an error about Python not recognizing PIL try the following:
python3 -m pip install --upgrade pip
python3 -m pip install --upgrade Pillow
The python script reduces the number of colors in the image to 256, and outputs an image.mem and palette.mem file. The image.mem file describes a BROM that's 8 bits wide (we have only 2^8=256 colors) and is (WIDTH*HEIGHT) values deep. The palette.mem file describes a BROM that's 24 bits wide (for the color specified), and 256 values deep. Make sure to move these into the data/ folder to make sure Vivado can see them.
With the BROM contents generated, we'll want to generate the actual BROMs in Verilog. They're defined in hdl/xilinx_single_port_ram_read_first.sv, and go ahead and instantiate two of them in image_sprite.sv - one for the image, and one for the palette. Feel free to copy the instantiation template at the end of xilinx_single_port_ram_read_first.sv. Let's run through the IO on the module:
RAM_WIDTHandRAM_DEPTHshould be changed based on the size of your BROM. If you're using the example image we provide, the source image is of size 256x256 bytes in depth and 8 bits in terms of width. To put it another way, each piece of data stored in the BROM is 8 bits wide, and there areWIDTH*HEIGHTdifferent addresses in the BROM.RAM_PERFORMANCEshould be left atHIGH_PERFORMANCE. This selects whether or not to include an additional register on the BRAM output, which can help with timing issues. We'll include this register for now, so just leave this atHIGH_PERFORMANCE.INIT_FILEshould be the name of the.memfile. Make sure this line contains theFPATHstatement (so like:.INIT_FILE(`FPATH(image.mem)))addrais the address of the ROM that's being read from. Route it appropriately.dinais the input to the BROM. Technically this BROM is actually a BRAM that we're disabling writes to, so just set this to zero.clkais the BRAM's clock, set this to the system clockweais a write enable signal. Since we're disabling writes, set this to zero.enais an enable signal. We can turn off the BRAM to save power, but we're not super worried about that right now, so just set it to 1 to permanently enable the BROM.rstais a reset signal, just route it to the system reset.regcea(1)lets us choose to enable the output register. We don't have a reason to disable this, so just set it to 1doutais the ROM's output data. Route it appropriately.
Once you've made both of these modules, you should be able to swap out your solid-colored sprites (which the image_sprite module starts out as) to image sprites.
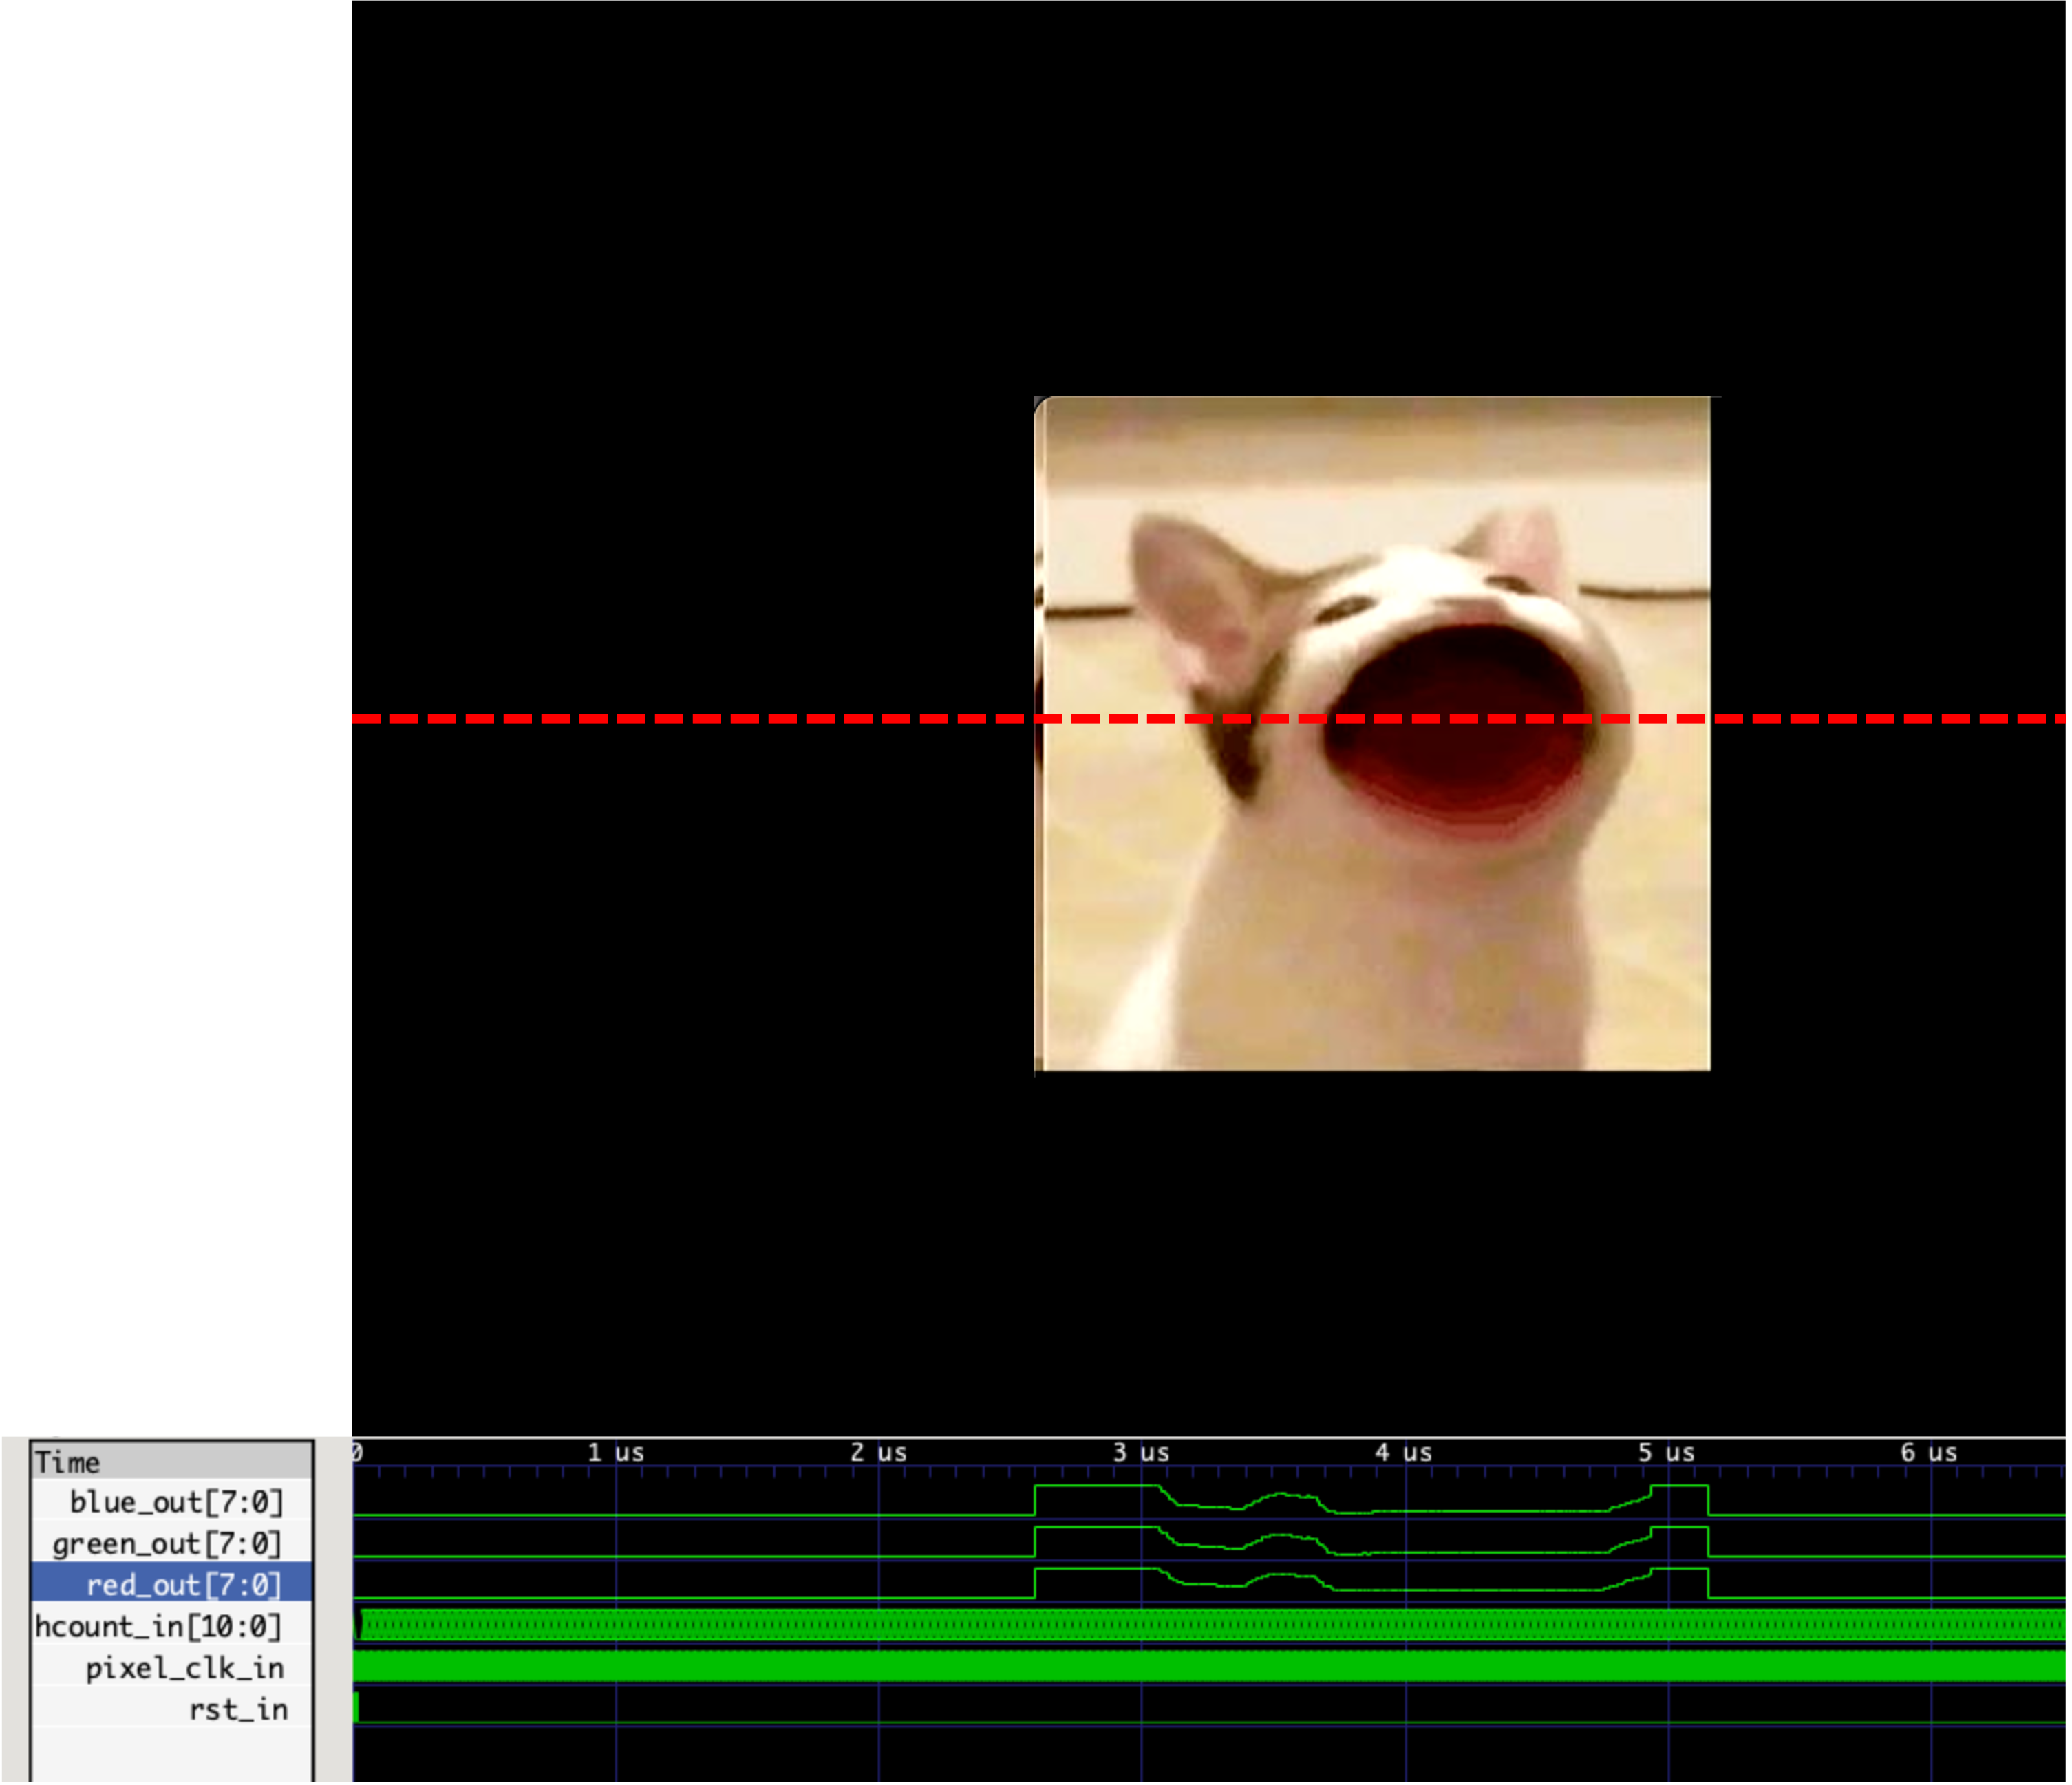
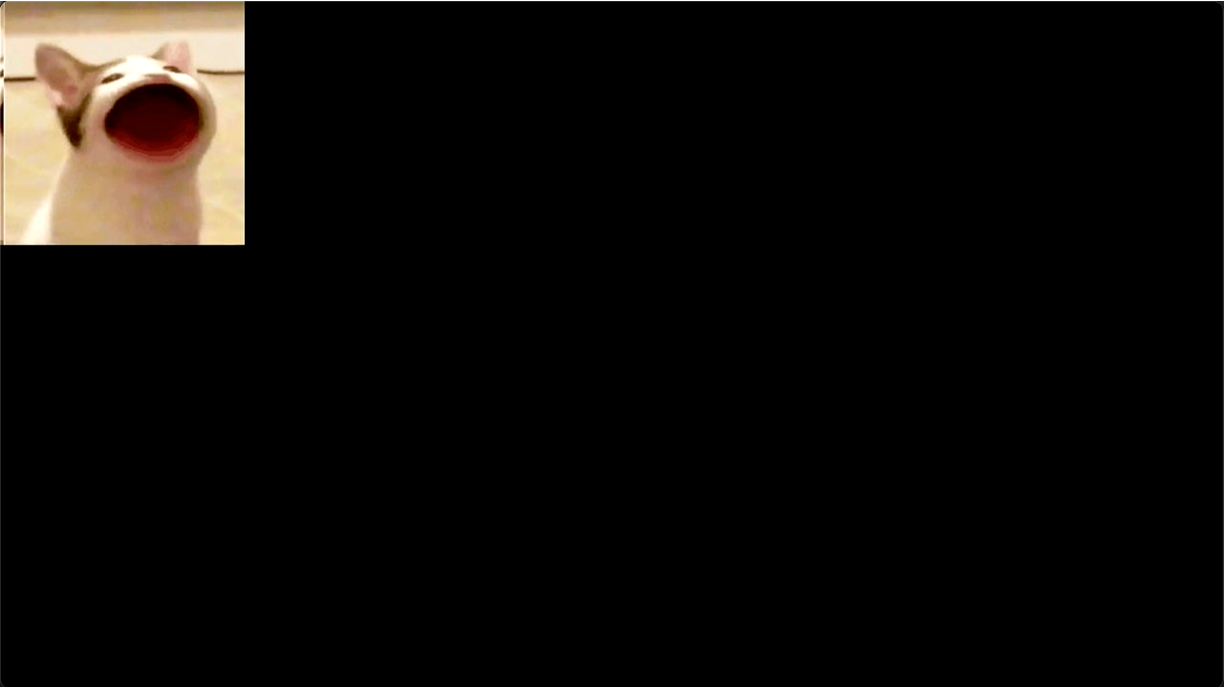
For debugging the image_sprite module we have a testbench (sim/test_image_sprite.py) for you found here you can place in your sim folder. Running that test will try to read an image and show its progression across one particular line shown below. The waveform of a working module is also provided here for reference so you can see it here. Make sure you're running your cocotb testbench from within the sim folder.
When you feel confident that you have a functioning image_sprite, fill up your top_level.sv file with the skeleton found at this link. Run a build and hopefully a popcat should show up in your top corner.
Nobody Puts PopCat in the Corner
Right now, Jennifer Grey...I mean PopCat... is always stuck in the corner. We could fix this by altering x_com and y_com. But even still having your image show up at the same spot repeatedly is boring. Let's add a little bit of variety by choosing a (pseudo) random position for popcat every time btn[1] is pressed. Do the same thing we did for pong in week 4. vcount and hcount are cycling up so fast that to our human eyes they're going to look like a random number. Use them to pick a value for popcat WITHIN THE BOUNDS OF THE SCREEN. We do not want PopCat going offscreen. When working you should have something that looks kinda like this...maybe a bit different.
Popping Popcat
OK. You've got popcat randomly teleporting all over the screen. (Check). The final thing to do is to have pop cat pop its mouth. In order to do that we need two images. One of the closed-mouth pop cat and one of the opened-mouthed variant. Now it is entirely logical to think that the next natural step would be to make two separate versions of the image_sprite module (one with mouth open and one with mouth closed) and then toggle between which one is getting shown. In some situations this could be a fine approach. However it is generally less efficient in terms of memory utilization since each popcat's image.mem file and palette.mem files are stored separately3. It's also just hard to manage.
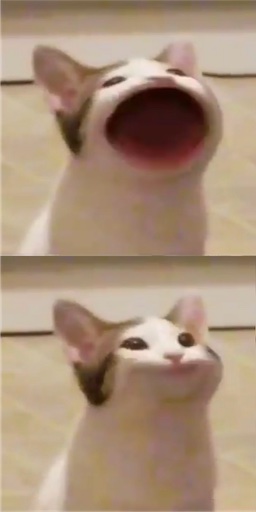
One more common approach is to utilize a sprite sheet. This is an "image" that is actually a stitched together version of multiple images as shown below. What you can do with this create an image.mem and palette.mem file for the entire thing and then based on the actual image you want, adjust your indexing into memory to grab it. In the case of our popcat, we originally started with a 256x256 pixel popcat image. This sprite sheet now is 256x512 in size, so you'll need to now have a image_sprite that is twice as deep (in terms of its image ROM depth). Further, depending on which popcat you want to draw, you will index into different regions. If you want to grab pixels from the first popcat, you can just index into it like before. If you want to grab pixels from the second, you need to offset your lookup address by the size of the first popcat (256x256).
![]()
This file can be grabbed from here.
Place the new file into your util folder and using img_to_mem.py, create two new .mem files corresponding to this sheet (this will require no changes to img_to_mem.py since it auto-detects file size). Move these output files to your data folder and rename them (just so you don't overwrite the original ones):
image2.mem: The image file for the popcat sprite sheet.palette2.mem: The palette file fo the popcat sprite sheet.
Finally, create a modified (don't destroy your original version) image_sprite (call it image_sprite_2) that has one added input to it: pop_in. When pop_in is low, the sprite image should be the closed-mouth popcat. When pop_in is high, the image should be the open-mouthed popcat.
Integrate this new popcat into your existing system and have popcat's mouth randomly open or close when it teleports to a new position (consider just grabbing one of the random bits from your hcount or vcount to get that bit or randomness you need). See the video below for an example:
For checkoff 1, show your popcat shifting around and popping and just bringing joy to the world in general.

Footnotes
1If you’ve ever done a paint-by-numbers painting before, it’s exactly the same concept. We want to store 16.7 million separate colors about about as badly as you'd want to have 16.7 million separate colors of paint.
2We could make them 2D, but that's harder for Vivado to create from the block memory on the chip, so we just use a 1D memory instead.
3not to mention the issue of "deadspace" in each image sprite's utilized BRAMs due to their inherent 18 kilobit chunk sizes.