Please Log In for full access to the web site.
Note that this link will take you to an external site (https://shimmer.mit.edu) to authenticate, and then you will be redirected back to this page.
In 6.205, we use the Vivado toolchain - which is this notoriously complicated piece of software that comes with quite a few caveats:
- It doesn't run on Apple Silicon Macs (M1, M1 Pro/Max/etc., M2, ...)
- For that matter, it doesn't run on any macs
- It doesn't run cleanly on most Linux/BSD distributions (the exception being certain last-gen Ubuntu versions, CentOS, and FreeBSD sometimes)
- The install clocks in at around 120GB...and that's before you try to build anything.
All of that said, Vivado is the industry standard right now, so we want to let you use it while making things as easy as possible. So, depending on your circumstances, we the course staff support three ways for you to use Vivado to do your labs:
- Install Vivado on your computer, if you run Windows or an appropriate Linux/BSD on an Intel or AMD processor
- Come into the lab and use the lab machines to do stuff
- [BETA] Use lab-bc, a new utility we wrote to build your stuff in the cloud1
We recommend option 1 if you have a Windows machine running on Intel or AMD, or if you'd like to try your hand at getting Vivado to work on a substantially recent version of Ubuntu. Otherwise, we recommend option 3, and then option 2.
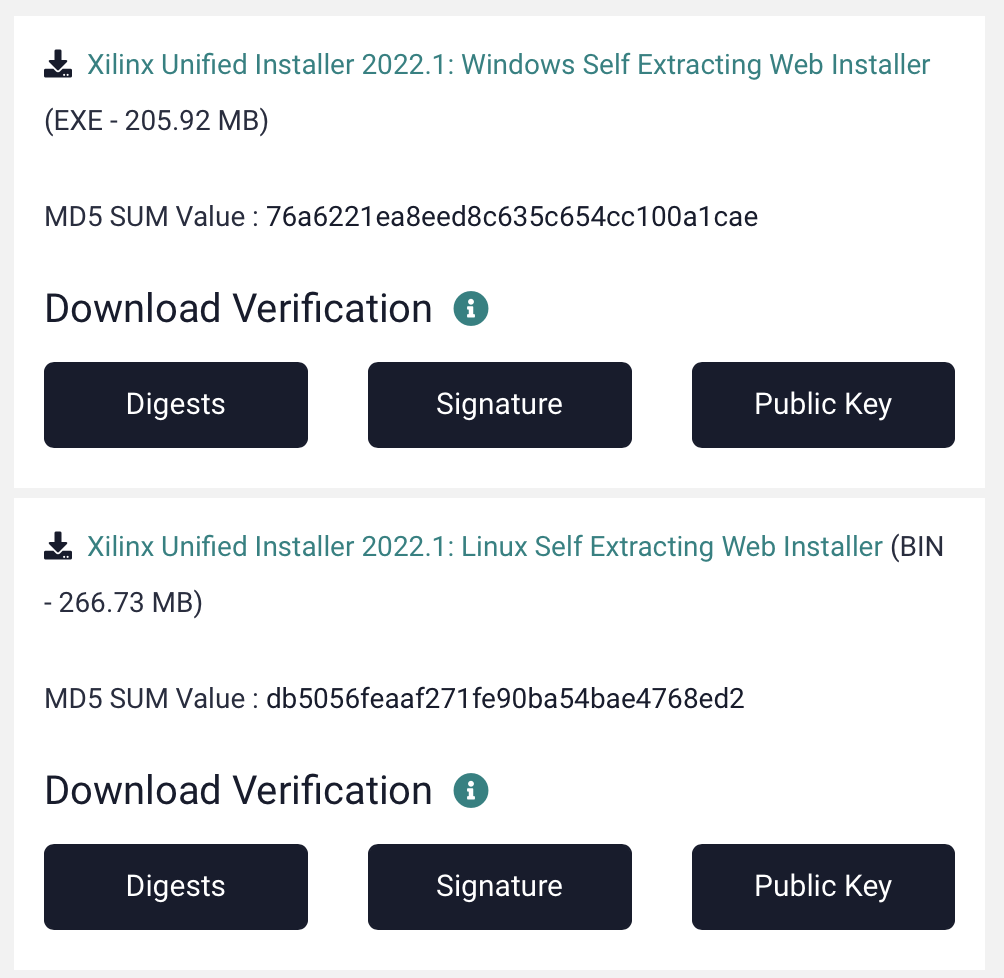
Once you've made an account with Xilinx if you don't have one already, you should be able to head over to their download page and grab a copy of the appropriate self-extracting web installer for your platform. You'll want 2022.1 - here's a picture of the right buttons to click.
sudo apt install -y libtinfo-dev libncurses-dev. On other distributions, your mileage may vary`Now that you've got the web installer, you can follow these excellent instructions from Digilent (the maker of our dev boards) to finish the install. Skip their download instructions and start with "To launch the installer...". Work your way down through step 1, skip step two even if you're on Linux (openFPGALoader covers this for us), and then roll through step 3.
You should be good to go now! If this worked for you, you should now be able to launch Vivado from the command line. Running it without any additional options / stuff on the end should spin up the GUI - close it out once you see it, since we won't be using the GUI again.
export PATH=$PATH:/tools/Xilinx/Vivado/2022.1/bin to your shell's .rc file (e.g. if you use bash, which is the default, you should append this to your ~/.bashrc), and then restarting your terminal.On Windows, this is going to work slightly differently - you'll need to run /tools/Xilinx/Vivado/2022.1/settings.bat in your command prompt (or powershell) before you try and use Vivado. We'll update these instructions if there's a better way to do this -- we think there is, but we aren't sure yet.
The lab computers have a full install of Vivado on them, following the steps listed above. You're free to use them any time you want - there are just a few caveats you should remember...

We upgraded all of the lab computers to Ubuntu 20.04 this year, rather than the old Debathena they used to run. They all have Vivado + openFPGALoader + iVerilog + etc. installed, which is awesome. But, this also has a few consequences:
- They build HDL really fast. Even the old ones.
- These lab computers are open-access. There's one user account - you'll notice when you come into lab that you won't have to type a password in to do stuff with the machines
- When you log out of the lab machines, they reboot and erase all of the files in your home directory.
What does this mean? It means that using the lab computers should be a breeze, but they trade convenience for performance - they no longer work like normal Athena computers. None of the work you do on a given machine is visible on any other machine, and you can't assume anything sticks around after you leave the lab.
So, if you plan to use the lab machines, they'll work great but you should have a plan to save your stuff elsewhere. Either you'll want to push your code to a (private!) git repository, or save it to a flash drive, or something. Just save your stuff somewhere, and then log out of the machine so that it's clean for the next person to use it.
Can't do a full install because you have a mac, or no hard disk space (or both, like me)? Don't want to use an ephemeral lab computer? You're in luck - we've engineered a way you can build your Verilog off your device transparently. You'll still need iVerilog and openFPGALoader and all those other tools, but you won't even need to think about installing Vivado.
To use lab-bc, make sure you have python3 installed on your machine somehow and download the lab-bc frontend here. I recommend you put it in your project directory (you will create one of these in lab 1 - just stash lab-bc.py in your downloads folder for now). Once you're done, run it with the -h flag (i.e. python3 lab-bc.py -h) to see a summary of how to use it (after an error that -h is not a recognized option).
lab-bc, you'll get a nice BrokenPipe error. This is because we need your ssh keys to authenticate you into the system. Head over to the SSH Key Setup page and fill in your ssh public key. If you don't have an SSH key, follow this guide to make one, up to and including "Adding your SSH key to the ssh-agent". Then, paste your public key into the setup page. We'll let you know if anything goes wrong, and you should have access to lab-bc once you've done this within ~24 hours.Generally, you're going to be running something like python3 lab-bc.py -o output_files - that builds the project in the current working directory (commonly abbreviated '.' in systems parlance) and places the bitfile + some logs in the directory output_files.
- You can override what project gets built with the
-p <projname>flag - just make sure the project you point it to has ansrcandxdcdirectory or else weird things will happen. - If you want to make Vivado generate diagnostic reports about your build (for example, utilization of FPGA resources or a summary of timing information), pass the
-dflag. This will be super useful in future labs.
Critical note: lab-bc is in VERY EARLY beta - the long-term plan here is to have lab-bc and its descendants completely replace local Vivado use in fall 2023 onward. However, we just started work on this - that means I literally wrote the version of lab-bc you see now last night with entirely too much caffeine in my system. Also, much of my backend is written in C and is somewhat complicated, so I can't have possibly fixed every possible bug that might come up. If something seems not right to you, take the following steps:
- run
lab-bcagain, with the-vflag - copy paste the output into a piazza post
- attach a zipped, tarred, whatever'd up copy of your project directory (including your copy of
lab-bc) to that post
I'll help you out as best I can, and we'll track bugs on Piazza so I can make sure this works for everyone.