Please Log In for full access to the web site.
Note that this link will take you to an external site (https://shimmer.mit.edu) to authenticate, and then you will be redirected back to this page.
After you use Vivado to build your design into a bitstream file like bit.out, you'll want to upload this to your FPGA. We'll use a tool called openFPGAloader for this, which does exactly what the name implies. However, the installation is a little different depending on your operating system.
Windows installation is a little bit tricky, and requires a few steps:
- Install MSYS2 from the official instructions. Leave all options at their defaults. This will install a handful of environments.
- Launch the UCRT x64 environment, it's the one with the yellow logo.
- Install openFPGAloader with
pacman -S mingw-w64-ucrt-x86_64-openFPGALoader - Check that openFPGAloader installed by running
openFPGAloader. You should see a help menu. - Plug in your FPGA, and wait for Windows to finish installing drivers. Double check this by making sure there isn't a yellow exclaimation mark next to any USB devices in Device Manager.
- Download the Zadig tool from its homepage.
- Open Zadig, and refresh devices from the top menu. Select the one labelled 'Digilent USB Device' from the dropdown.
- Select the
WinUSBdriver as the replacement for theFTDIBUSdriver. Once done, Zadig should look like what's below:
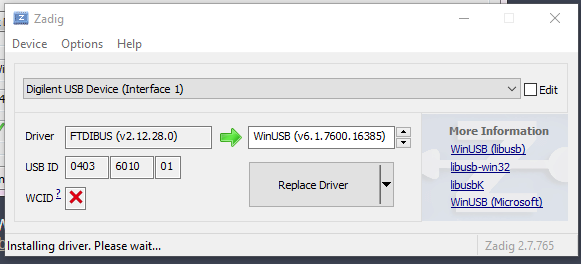
- Replace the driver. This will take a few minutes, and Zadig should show that the new driver is installed. Make sure you do this for both
Digilent USB Device Interface (1)andInterface (2). 1 - You're almost ready to test! Navigate to the folder containing the
bit.outfile from earlier. The C drive on MSYS2 is a separate folder, so you'll have tocd /c/Users/<user>/Desktopif your bit file is on the Desktop, for example. - Test using the command in the usage section below.
Installing via Homebrew is the easiest install method on macOS. This is as simple as brew install openFPGAloader, but the official docs contain instructions for compiling from source if you're interested.
This process varies a bit on what distro you're running, but it's best described on the official docs. If you need to build from source, just leave the build options as their defaults. In our testing we haven't found a reason to change them.
Godspeed, brave soul. 🫡
We'll test your installation by trying to upload an example bitfile to your board. Download the example bitfile here, and plug in your FPGA. Load the bitstream onto the board with:
openFPGALoader -b arty_a7_100t example.bit
This command works for any bitstream built for the Nexys 4 DDR or Arty A7 boards. It should hopefully produce output similar to below:
Jtag frequency : requested 10.00MHz  -> real 10.00MHz
Open file DONE
Parse file DONE
load program
Flash SRAM: [===================================================] 100.00%
Done
Once done, your board should be programmed with a simple soft-processor that runs when sw[15] is in the up position, and freezes when sw[0] is down. If this happens, you're good to go.