Vivado
Our Primary Toolchain
Please Log In for full access to the web site.
Note that this link will take you to an external site (https://shimmer.mit.edu) to authenticate, and then you will be redirected back to this page.
There's a lot happening here! If you have any questions about this stuff, make a piazza post and we'll get back to you. Hopefully we can make your Vivado setup process as painless as possible, so you can spend less time playing with your system and more time building cool stuff (:
In 6.205, we use the Vivado toolchain - a beautiful but complicated piece of software that comes with quite a few caveats:
- The install can range anywhere from 70 to 120GB...and that's before you try to build anything. (2024 with sufficient bells and whistles is 83 GB).
- It only runs natively on Windows and most Linux distributions (Mac is not natively supported)
- Even if you spin up a VM or dual-boot your Mac into Windows or Linux, it has no native build for ARM silicon or Apple Silicon Macs (M1, M1 Pro/Max/etc., M2, ...) though with emulation/rosetta/whatever you can kinda sorta get it to work, but it is a mess and not 100% stable.

Vivado is also a lot to take in and can be overwhelming. The learning curve can be pretty steep, the documentation can be a maze, the online forums are littered with five year old unresolved threads of people trying to figure things out. If you're coming from a software engineering background with their fancy-schmancy all-inclusive IDEs with dark mode or whatever à la Jetbrains/VSCode, oh my sweet summer child, Vivado is going to be a surprise for you. This isn't even my opinion, this is just feedback we've received from students for years.

But, as the saying goes, "Perfect is the enemy of Good,"...or something. And Vivado is pretty good. A lot of complaints about using arise from relatively superficial parts of it, whereas the core of Vivado (its synthesis engine and place and route) is very good. It is one of the industry standards right now and for good reason. It is very powerful and brings a lot to the table. Consequently, we want to let you use it while making things as easy as possible. Towards that end we're going to do it in a way that most "intro" courses don't do it. We're going to rely largely on scripting and avoid the Vivado GUI until we absolutely cannot (a good number of you will likely use it on final projects). At that point, you'll be mature enough and can see it for what it is. In doing this, we're trying to keep our class as platform-agnostic as possible while still letting you get some good development cycles in.
However we still need to get access to Vivado so, depending on your circumstances, we the course staff support three ways for you to use Vivado to do your labs:
- Option 1: Use lab-bc: a newer utility written by Jay Lang in 2022/23 as his MEng thesis and then branched/updated for portability by Joe in 2024 which lets you build your stuff in the cloud1
- Pros: You avoid locally installing Vivado, saving space and time.
- Cons: I'd say it is slower, but the machines we're running this platform on are so damned performant, it is only about 20% worse.
- Option 2: Install Vivado on your computer: if you run Windows or an appropriate Linux/BSD on an Intel or AMD processor
- Pros: You have your own Vivado to use whenever you want and you never, ever have to share. It can also run pretty fast if you have a fast computer.
- Cons: You need to install it and it can take up a lot of space and it may not even be possible to install depending on your computer.
- Option 3: Use lab machines directly to do stuff.
- Pros: You avoid all installations and don't have to figure out the very simple
lab-bcinfrastructure - Cons: There are 50 lab machines and you have to share with other people and nobody likes to do that. When the lab deadline is one hour away, the notion that "sharing is caring" goes right down the toilet.
- Pros: You avoid all installations and don't have to figure out the very simple
We'd recommend option 1 to be honest. It is the quickest and easiest to setup. If you do want to do Option 2, great, but it can take some time to set up. Otherwise, we recommend option 3.
Option 1: Use the remote lab build client (lab-bc)
Can't do a full install because you have a mac, or no hard disk space (or both, like me)? Don't want to use a lab computer? You're in luck - we've engineered a way you can build your Verilog off your device transparently. You'll still need iVerilog and openFPGALoader and all those other tools, but you won't even need to think about installing Vivado.
To use lab-bc, make sure you have python3 and git installed on your machine. Clone onto your computer lab-bc-client which is hosted here: https://github.com/jodalyst/lab_bc_client.
Either do:
git clone https://github.com/jodalyst/lab_bc_client.git
or
git clone git@github.com:jodalyst/lab_bc_client.git
We'd strongly recommend you install any Python libraries (including cocotb) using a virtual environment. You probably already did this when you installed cocotb! If so, just re-activate that environment. If you haven't yet created one, you can do so with the command:
python3 -m venv ~/6205_python
Where "6205_python" is the name of the Python virtual environment. You can use this Python environment and avoid messing up your system python with the installations.
You can activate the environment with the command source ~/6205_python/bin/activate. You'll see (6205_python) precede lines in your shell indicating the environment is active. Do this whenever you start a terminal and begin working on your 6.205 work!
While a virtual environment is running, you can deactivate it and return to your typical Python environment with the shell command deactivate.
cd into lab-bc-client and then use pip to install it by doing pip install . If the installation is successful, lab-bc will be added to your path.
There are two valid commands for lab-bc. lab-bc run is what you'll use normally for builds. Before you do that though you need to provide your MIT "credentials" so the server will let you run builds. To do this run:
lab-bc configure
Enter your kerberos and MIT ID number when prompted. Once done, it'll write a configuration file to your computer that will be used on future runs of lab-bc.
When it is time to run, go into your project folder and run lab-bc run ./. Or, you can go to the folder containing your project, and run: lab-bc run <project_name>. Either of these options will send your project up to the server for a build (you'll do your first ones of this in the first week assignments). What you get back from this will basically be what you'd get if you're running Vivado locally. It really is that simple. Kind of cool, yes?!
Option 2: Install Vivado locally

First thing's first, you'll need to make an account on Xilinx's website in order to download Vivado. Make sure to use your MIT email and to specify you're from "Massachusetts Institute of Technology" otherwise you might get some sort of Export Restriction issue. Do note -- "MIT" is not the same as "Massachusetts Institute of Technology"!
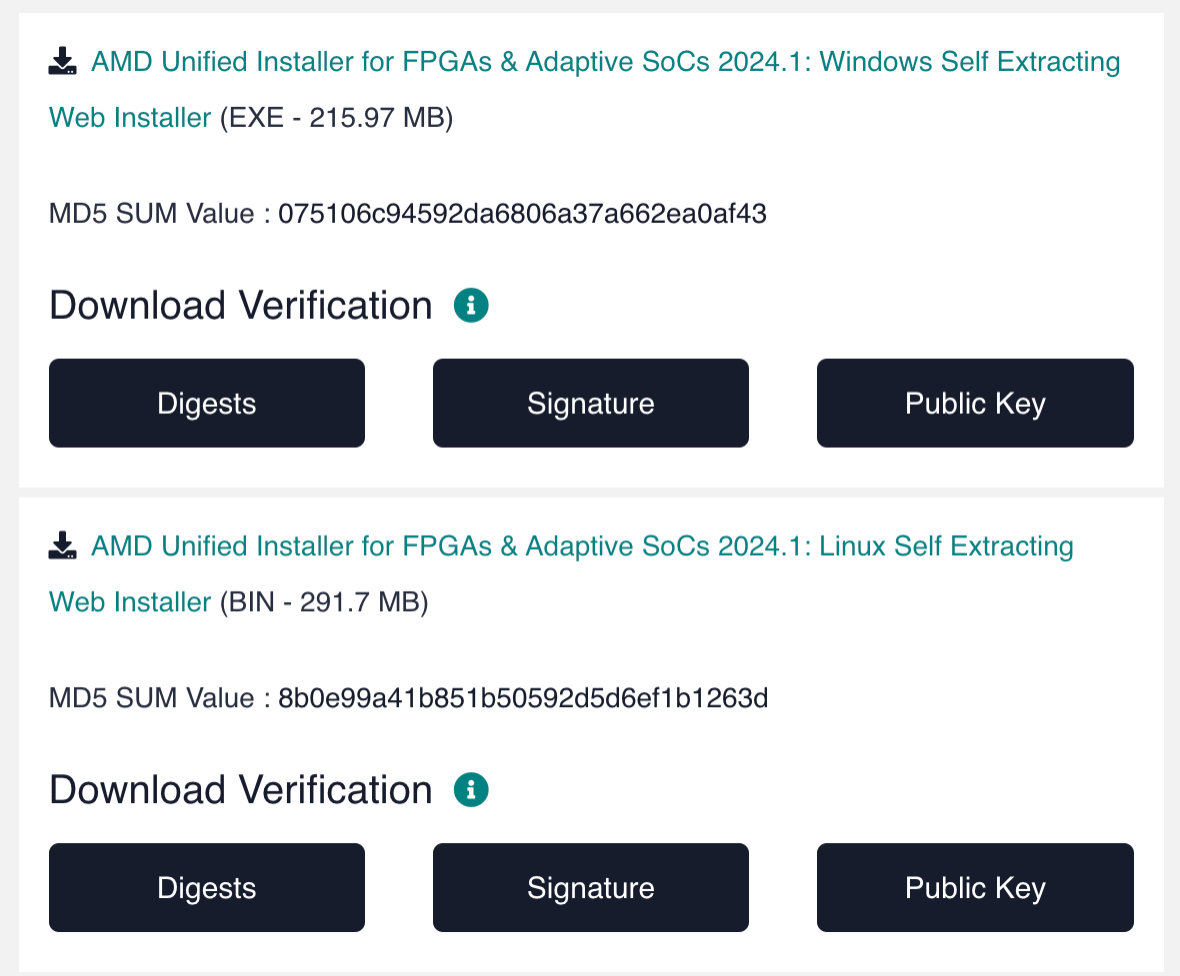
Once you've made an account with Xilinx if you don't have one already, you should be able to head over to their download page and grab a copy of the appropriate self-extracting web installer for your platform. You'll want 2024.1 - here's a picture of the right buttons to click.

On Ubuntu, you'll need to install the libtinfo-dev and libncurses-dev packages from apt for this to work - that's sudo apt install -y libtinfo-dev libncurses-dev. On other distributions, your mileage may vary` If you are on Ubuntu 2024, please post on Piazza. Joe can help you do the right symlinks.
Now that you've got the web installer, you can follow these excellent instructions from Digilent (the maker of our dev boards from last year) to finish the install. Skip their download instructions and start with "To launch the installer...". Work your way down through step 1, skip step two even if you're on Linux (openFPGALoader covers this for us), and then roll through step 3.
You should be good to go now! If this worked for you, you should now be able to launch Vivado from the command line. Running it without any additional options / stuff on the end should spin up the GUI - close it out once you see it, since we won't be using the GUI again.
Ok, I lied, maybe this won't work right away. If you're on Linux, you'll need to add Vivado to your $PATH variable so that your terminal picks up the install you just did. Try adding export PATH=$PATH:/tools/Xilinx/Vivado/2024.1/bin to your shell's .rc file (e.g. if you use bash, which is the default, you should append this to your ~/.bashrc), and then restarting your terminal.
On Windows, this is going to work slightly differently - you'll need to run /tools/Xilinx/Vivado/2024.1/settings.bat in your command prompt (or powershell) before you try and use Vivado. You can also just manually add all the following to your path by editing your Environment Variables:
add the PATH C:\Xilinx\Vivado\2024.1\bin
add the PATH C:\Xilinx\Vivado\2024.1\lib\win64.o
add the PATH C:\Xilinx\DocNav
add the PATH C:\Xilinx\Vitis_HLS\2024.1\bin
add the PATH C:\Xilinx\Model_Composer\2024.1\bin

SET XILINX_VIVADO=C:\Xilinx\Vivado\2024.1
SET XILINX_HLS=C:\Xilinx\Vitis_HLS\2024.1
Option 3: Running Stuff on the Lab Computers
The lab machines are running Ubuntu 24.04 and should have an account for you on them. Your login is your kerberos and your MIT ID number.

Note the lab machines are not synchronized with one another. Your files on one machine will not appear on the others. I chose not to do this since a "thin client" such as Debathena sacrifices a ton of performance in the name of all that virtual stuff....just isn't worth it. It is your responsibility to manage the files on these machines. We encourage you to use git or alternatively, a USB drive or something.
Conclusion
So that's it. The biggest, neediest piece of software in the class should now be working.
